--- /dev/null
+# 在 node-inspector 裡為主程序除錯
+
+[`node-inspector`][node-inspector] 提供一個大家熟悉的圖形介面開發工具,可以在 Chrome 使用這個工具為 Electron 的主程序除錯。然而因為 `node-inspector` 依靠依些原生的 Node 模組,他必須為你想除錯的 Electron 版本重新建制。你可以自己重新建置 `node-inspector` 的相依檔案,或是由
+[`electron-inspector`][electron-inspector] 幫你完成,這兩種方法都包含在這篇文件中。
+
+**注意**:在這篇文件撰寫時,最新版的 `node-inspector`
+(0.12.8) 不能在沒有更新其中一個相依檔案的情形下,為 Electron 1.3.0 或更新的版本重新建置,你在使用 `electron-inspector` 的時候必須注意這一點。
+
+
+## 使用 `electron-inspector` 除錯
+
+### 1. 安裝 [node-gyp required tools][node-gyp-required-tools]
+
+### 2. 安裝 [`electron-rebuild`][electron-rebuild]
+
+```shell
+npm install electron-rebuild --save-dev
+```
+
+### 3. 安裝 [`electron-inspector`][electron-inspector]
+
+```shell
+npm install electron-inspector --save-dev
+```
+
+### 4. 啟動 Electron
+
+搭配 `--debug` 參數開啟 Electron
+
+```shell
+electron --debug=5858 your/app
+```
+
+或者在第1行 JavaScript 暫停執行:
+
+```shell
+electron --debug-brk=5858 your/app
+```
+
+### 5. 開啟 electron-inspector
+
+在 macOS / Linux 上:
+
+```shell
+node_modules/.bin/electron-inspector
+```
+
+在 Windows 上:
+
+```shell
+node_modules\\.bin\\electron-inspector
+```
+
+`electron-inspector` 在第一次執行,以及你每次更換 Electron 版本時需要重新建置 `node-inspector` 的相依檔案。重新建置的過程可能需要透過網路連線下載 Node 標頭檔和函式庫,且需要一段時間。
+
+### 6. 載入除錯工具介面
+
+在 Chrome 瀏覽器中打開 http://127.0.0.1:8080/debug?ws=127.0.0.1:8080&port=5858。如果有使用 `--debug-brk` 選項,你有可能需要按暫停鍵強制更新介面。
+
+## 使用 `node-inspector` 除錯
+
+### 1. 安裝 [node-gyp required tools][node-gyp-required-tools]
+
+### 2. 安裝 [`node-inspector`][node-inspector]
+
+```bash
+$ npm install node-inspector
+```
+
+### 3. 安裝 [`node-pre-gyp`][node-pre-gyp]
+
+```bash
+$ npm install node-pre-gyp
+```
+
+### 4. 為 Electron 重新編譯 `node-inspector` `v8` 模組
+
+**注意:** 請把 `target` 參數改成你的 Electron 版本號碼
+
+```bash
+$ node_modules/.bin/node-pre-gyp --target=1.2.5 --runtime=electron --fallback-to-build --directory node_modules/v8-debug/ --dist-url=https://atom.io/download/atom-shell reinstall
+$ node_modules/.bin/node-pre-gyp --target=1.2.5 --runtime=electron --fallback-to-build --directory node_modules/v8-profiler/ --dist-url=https://atom.io/download/atom-shell reinstall
+```
+
+請參考 [How to install native modules][how-to-install-native-modules].
+
+### 5. 啟用 Electron 除錯模式
+
+你可以使用 debug 標籤啟動 Electron:
+
+```bash
+$ electron --debug=5858 your/app
+```
+
+或是在第1行暫停程式:
+
+```bash
+$ electron --debug-brk=5858 your/app
+```
+
+### 6. 使用 Electron 開啟 [`node-inspector`][node-inspector] 伺服器
+
+```bash
+$ ELECTRON_RUN_AS_NODE=true path/to/electron.exe node_modules/node-inspector/bin/inspector.js
+```
+
+### 7. 載入除錯工具介面
+
+在 Chrome 瀏覽器打開 http://127.0.0.1:8080/debug?ws=127.0.0.1:8080&port=5858 。如果有使用 `--debug-brk` 啟動 Electron ,你有可能要點擊暫停鍵才能看到進入點。
+
+[electron-inspector]: https://github.com/enlight/electron-inspector
+[electron-rebuild]: https://github.com/electron/electron-rebuild
+[node-inspector]: https://github.com/node-inspector/node-inspector
+[node-pre-gyp]: https://github.com/mapbox/node-pre-gyp
+[node-gyp-required-tools]: https://github.com/nodejs/node-gyp#installation
+[how-to-install-native-modules]: using-native-node-modules.md#how-to-install-native-modules
--- /dev/null
+# 桌面環境整合
+
+為了將桌面應用程式整合到桌面環境,不同的作業系統會提供不同的功能。舉例來說:在 Windows 中,應用程式可以在任務欄的彈跳式清單放上捷徑;而在Mac中,應用程式可以在 dock 選單上加入自訂的選單。
+
+這份教學將會告訴你如何透過 Electron APIs,將自己的應用程式整合到這些桌面環境。
+
+## 通知區域 (Windows, Linux, macOS)
+
+這3個作業系統都有提供讓應用程式對使用者發送訊息的方法。Electron 讓使用者能透過 [HTML5 Notification API](https://notifications.spec.whatwg.org/), 輕鬆的對使用者發送通知,並透過當前作業系統原生的通知 APIs 顯示。
+
+**注意:** 畢竟是 HTML5 API,這只能在渲染程序中使用。
+
+```javascript
+let myNotification = new Notification('Title', {
+ body: 'Lorem Ipsum Dolor Sit Amet'
+})
+
+myNotification.onclick = () => {
+ console.log('Notification clicked')
+}
+```
+
+雖然跨系統的程式碼和使用者體驗非常類似,但是還是有些明顯的差距。
+
+### Windows
+
+* 在 Windows 10 中, 通知功能可以直接運行.
+* 在 Windows 8.1 and Windows 8, 你必須在開始視窗加入一個 [Application User
+Model ID][app-user-model-id] 格式的捷徑。但是筆記不需要被釘選在開始視窗中。
+* 在 Windows 7, 通知功能並不被支援,不過你可以用 [Tray API][tray-balloon] 發送"通知氣球"。
+
+此外, 通知內容的長度限制是 250 個字元,但是 Windows 開發團隊建議將通知內容控制在 200 個字元以內
+
+### Linux
+
+通知是使用 `libnotify` 發送, 可以在任何依照 [Desktop Notifications
+Specification][notification-spec] 格式的桌面環境發送通知內容, 這些桌面環境包含 Cinnamon, Enlightenment, Unity,
+GNOME, KDE...等等。
+
+### macOS
+
+通知是直接送到 macOS, 不過你必須留意
+[Apple's Human Interface guidelines regarding notifications](https://developer.apple.com/library/mac/documentation/UserExperience/Conceptual/OSXHIGuidelines/NotificationCenter.html).
+
+要注意通知內容的大小限制是 256 位元,超出限制的內容會被捨棄。
+
+## 最近存取文件 (Windows & macOS)
+
+Windows 和 macOS 提供簡單的方式,可以存取使用者最近透過 Windows 彈跳式清單 ,或是 macOS 的 dock 選單存取過的文件列表。
+
+__彈跳式清單:__
+
+
+
+__應用程式 dock 選單:__
+
+<img src="https://cloud.githubusercontent.com/assets/639601/5069610/2aa80758-6e97-11e4-8cfb-c1a414a10774.png" height="353" width="428" >
+
+若要新增檔案到"最近存取文件",你可以透過 [app.addRecentDocument][addrecentdocument] API:
+
+```javascript
+const {app} = require('electron')
+app.addRecentDocument('/Users/USERNAME/Desktop/work.type')
+```
+
+你也可以使用 [app.clearRecentDocuments][clearrecentdocuments] API 來清空"最近存取文件":
+
+```javascript
+const {app} = require('electron')
+app.clearRecentDocuments()
+```
+
+### Windows 上要注意的事項
+
+為了使用這些 Windows 上的功能,你的應用程式必須先註冊為那個檔案型別的處理程式,否則就算你之後已經註冊,檔案還是不會出現在彈跳式清單中。你可以參考 [Application Registration][app-registration] ,了解所有關於註冊應用程式的資訊。
+
+當使用者在彈跳式清單中點擊檔案時,會開啟一個新的應用程式實例,檔案路徑會加入一個命令列指令。
+
+### macOS 上要注意的事項
+
+當一個檔案在"最近存取文件"選單中被提出請求,會發出 `app` 模組的 `open-file` 事件。
+
+## 自訂 Dock 選單 (macOS)
+
+macOS 允許使用者為 dock 設定自訂選單, 通常會包含你的應用程式中常用的功能捷徑:
+
+__Dock menu of Terminal.app:__
+
+<img src="https://cloud.githubusercontent.com/assets/639601/5069962/6032658a-6e9c-11e4-9953-aa84006bdfff.png" height="354" width="341" >
+
+為了設定自訂的 dock 選單, 你可以使用 `app.dock.setMenu` API, 但是也只能在 macOS 上使用:
+
+```javascript
+const {app, Menu} = require('electron')
+
+const dockMenu = Menu.buildFromTemplate([
+ {label: 'New Window', click () { console.log('New Window') }},
+ {label: 'New Window with Settings',
+ submenu: [
+ {label: 'Basic'},
+ {label: 'Pro'}
+ ]
+ },
+ {label: 'New Command...'}
+])
+app.dock.setMenu(dockMenu)
+```
+
+## 使用者任務 (Windows)
+
+在 Windows 上,你可以在彈跳式清單的 `Tasks` 類別中設定自訂的動作。 MSDN 中也有提到:
+
+> Applications define tasks based on both the program's features and the key
+> things a user is expected to do with them. Tasks should be context-free, in
+> that the application does not need to be running for them to work. They
+> should also be the statistically most common actions that a normal user would
+> perform in an application, such as compose an email message or open the
+> calendar in a mail program, create a new document in a word processor, launch
+> an application in a certain mode, or launch one of its subcommands. An
+> application should not clutter the menu with advanced features that standard
+> users won't need or one-time actions such as registration. Do not use tasks
+> for promotional items such as upgrades or special offers.
+>
+> It is strongly recommended that the task list be static. It should remain the
+> same regardless of the state or status of the application. While it is
+> possible to vary the list dynamically, you should consider that this could
+> confuse the user who does not expect that portion of the destination list to
+> change.
+
+__Internet Explorer 的使用者任務:__
+
+
+
+比較不同的是, macOS 中的 dock 選單是真正的選單, Windows 上的使用者任務比較像是應用程式捷徑。像是在使用者點擊一個任務時,程式會以特定的參數執行。
+
+要為應用程式設定使用者任務, 你可以使用 [app.setUserTasks][setusertaskstasks] API:
+
+```javascript
+const {app} = require('electron')
+app.setUserTasks([
+ {
+ program: process.execPath,
+ arguments: '--new-window',
+ iconPath: process.execPath,
+ iconIndex: 0,
+ title: 'New Window',
+ description: 'Create a new window'
+ }
+])
+```
+
+若要清空任務清單,只要呼叫 `app.setUserTasks`,伴隨一個空的陣列當作參數:
+
+```javascript
+const {app} = require('electron')
+app.setUserTasks([])
+```
+
+這個使用者任務在你的應用程式關閉之後依然會顯示,所以在應用程式解除安裝之前,任務的圖示和程式路徑都必須存在。
+
+## 縮圖工具列 (Windows)
+
+在 Windows 上,你可以把包含特定按鈕的縮圖工具列,加到應用程式的任務欄。這可以讓使用者在不用重建或啟動視窗的情況下,使用某個視窗的指令。
+
+在 MSDN 裡是這麼描述:
+
+> This toolbar is simply the familiar standard toolbar common control. It has a
+> maximum of seven buttons. Each button's ID, image, tooltip, and state are defined
+> in a structure, which is then passed to the taskbar. The application can show,
+> enable, disable, or hide buttons from the thumbnail toolbar as required by its
+> current state.
+>
+> For example, Windows Media Player might offer standard media transport controls
+> such as play, pause, mute, and stop.
+
+__Windows Media Player 的縮圖工具列:__
+
+
+
+你可以在應用程式裡使用 [BrowserWindow.setThumbarButtons][setthumbarbuttons] 設定縮圖工具列:
+
+```javascript
+const {BrowserWindow} = require('electron')
+const path = require('path')
+
+let win = new BrowserWindow({
+ width: 800,
+ height: 600
+})
+
+win.setThumbarButtons([
+ {
+ tooltip: 'button1',
+ icon: path.join(__dirname, 'button1.png'),
+ click () { console.log('button1 clicked') }
+ },
+ {
+ tooltip: 'button2',
+ icon: path.join(__dirname, 'button2.png'),
+ flags: ['enabled', 'dismissonclick'],
+ click () { console.log('button2 clicked.') }
+ }
+])
+```
+
+要清除縮圖工具列的按鈕,只要呼叫 `BrowserWindow.setThumbarButtons`,伴隨一個空的陣列當作參數:
+
+```javascript
+const {BrowserWindow} = require('electron')
+let win = new BrowserWindow()
+win.setThumbarButtons([])
+```
+
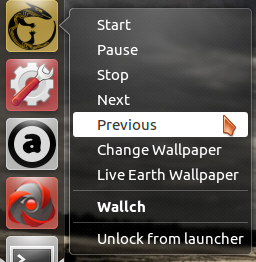
+## Unity 啟動器捷徑 (Linux)
+
+在 Unity, 你可以透過修改 `.desktop` 檔案,為啟動器增加自訂的項目, 請參考 [Adding Shortcuts to a Launcher][unity-launcher].
+
+__Audacious 的啟動器捷徑:__
+
+
+
+## 任務欄的進度條 (Windows, macOS, Unity)
+
+在 Windows 上, 任務欄的按鈕可以用來顯示進度調.這讓應用程式可以在不用切換視窗的情形下,顯示進度資訊。
+
+在 macOS 上, 進度條是 dock 圖示的一部份.
+
+Unity 桌面環境也有類似的功能,讓你可以設定啟動器裡的進度條。
+
+__任務欄按鈕裡的進度條:__
+
+
+
+你可以使用 [BrowserWindow.setProgressBar][setprogressbar] API 設定視窗的進度條:
+
+```javascript
+const {BrowserWindow} = require('electron')
+let win = new BrowserWindow()
+win.setProgressBar(0.5)
+```
+
+## 任務欄圖示上的疊加物 (Windows)
+
+在 Windows 上,你可以在圖示上放一個小小的疊加物,顯示應用程式狀態。 MSDN 的描述:
+
+> Icon overlays serve as a contextual notification of status, and are intended
+> to negate the need for a separate notification area status icon to communicate
+> that information to the user. For instance, the new mail status in Microsoft
+> Outlook, currently shown in the notification area, can now be indicated
+> through an overlay on the taskbar button. Again, you must decide during your
+> development cycle which method is best for your application. Overlay icons are
+> intended to supply important, long-standing status or notifications such as
+> network status, messenger status, or new mail. The user should not be
+> presented with constantly changing overlays or animations.
+
+__任務欄圖示上的疊加物:__
+
+
+
+你可以使用[BrowserWindow.setOverlayIcon][setoverlayicon] API 設定任務欄圖示上的疊加物:
+
+```javascript
+const {BrowserWindow} = require('electron')
+let win = new BrowserWindow()
+win.setOverlayIcon('path/to/overlay.png', 'Description for overlay')
+```
+
+## 閃爍特效 (Windows)
+
+在 Windows 上,你可以透過強調任務欄按鈕來吸引使用者注意,這很像是 macOS 裡 dock 圖示的彈跳特效。
+MSDN 的參考文件提及:
+
+> Typically, a window is flashed to inform the user that the window requires
+> attention but that it does not currently have the keyboard focus.
+
+你可以使用 [BrowserWindow.flashFrame][flashframe] API 控制 BrowserWindow 的任務欄按鈕閃爍特效:
+
+```javascript
+const {BrowserWindow} = require('electron')
+let win = new BrowserWindow()
+win.once('focus', () => win.flashFrame(false))
+win.flashFrame(true)
+```
+
+別忘了也可以在呼叫 `flashFrame` 時加入 `false` 參數關掉閃爍特效。 在上面的範例, 他會在視窗取得焦點時被呼叫, 但是你有有可能需要使用計時器或其他事件來關掉他。
+
+## 視窗的代表檔案 (macOS)
+
+在 macOS 上,一個視窗可以設定他的代表檔案, 也可以在標題列上顯示檔案的圖示。當使用者按住 Command 或 Control 鍵點擊標題列時, 會跳出顯示路徑的彈跳視窗。
+
+你也可以設定編輯狀態,這樣可以在檔案圖示標示視窗內的文件是不是被編輯過。
+
+__代表檔案的彈跳視窗:__
+
+<img src="https://cloud.githubusercontent.com/assets/639601/5082061/670a949a-6f14-11e4-987a-9aaa04b23c1d.png" height="232" width="663" >
+
+你可以使用 [BrowserWindow.setRepresentedFilename][setrepresentedfilename] 或 [BrowserWindow.setDocumentEdited][setdocumentedited] APIs 設定視窗的代表檔案或編輯狀態:
+
+```javascript
+const {BrowserWindow} = require('electron')
+let win = new BrowserWindow()
+win.setRepresentedFilename('/etc/passwd')
+win.setDocumentEdited(true)
+```
+
+## 將檔案拖曳出視窗
+
+在某些會操作檔案的應用程式中, 能從 Electron 拖曳檔案到其他應用程式是非常重要的。 若要在你的應用程式使用這個功能,你必須在 `ondragstart` 事件中呼叫 `webContents.startDrag(item)` API。
+
+在頁面中:
+
+```html
+<a href="#" id="drag">item</a>
+<script type="text/javascript" charset="utf-8">
+ document.getElementById('drag').ondragstart = (event) => {
+ event.preventDefault()
+ ipcRenderer.send('ondragstart', '/path/to/item')
+ }
+</script>
+```
+
+在主程序中:
+
+```javascript
+const {ipcMain} = require('electron')
+ipcMain.on('ondragstart', (event, filePath) => {
+ event.sender.startDrag({
+ file: filePath,
+ icon: '/path/to/icon.png'
+ })
+})
+```
+
+其他資料:
+
+[addrecentdocument]: ../api/app.md#appaddrecentdocumentpath-os-x-windows
+[clearrecentdocuments]: ../api/app.md#appclearrecentdocuments-os-x-windows
+[setusertaskstasks]: ../api/app.md#appsetusertaskstasks-windows
+[setprogressbar]: ../api/browser-window.md#winsetprogressbarprogress
+[setoverlayicon]: ../api/browser-window.md#winsetoverlayiconoverlay-description-windows-7
+[setrepresentedfilename]: ../api/browser-window.md#winsetrepresentedfilenamefilename-os-x
+[setdocumentedited]: ../api/browser-window.md#winsetdocumenteditededited-os-x
+[app-registration]: http://msdn.microsoft.com/en-us/library/windows/desktop/ee872121(v=vs.85).aspx
+[unity-launcher]: https://help.ubuntu.com/community/UnityLaunchersAndDesktopFiles#Adding_shortcuts_to_a_launcher
+[setthumbarbuttons]: ../api/browser-window.md#winsetthumbarbuttonsbuttons-windows-7
+[tray-balloon]: ../api/tray.md#traydisplayballoonoptions-windows
+[app-user-model-id]: https://msdn.microsoft.com/en-us/library/windows/desktop/dd378459(v=vs.85).aspx
+[notification-spec]: https://developer.gnome.org/notification-spec/
+[flashframe]: ../api/browser-window.md#winflashframeflag