--- /dev/null
+# Electron FAQ
+
+## Electronは、いつ最新のChromeにアップグレードされますか?
+
+ElectronのChromeバージョンは、通常、新しいChromeのstabeleバージョンがリリースされた後、1~2週間以内に上げられます。
+
+また、Chromeのstableチャンネルのみを使用し、もし、重要な修正がbetaまたはdevチャンネルにある場合、それをバックポートします。
+
+## Electronは、いつ最新のNode.jsにアップグレードされますか?
+
+Node.jsの新しいバージョンがリリースされたとき、とても頻繁に発生している新しいNode.jsバージョンで取り込まれたバグによる影響を避けるために、ElectronのNode.jsをアップグレードする前に、通常、約1カ月待ちます。
+
+通常、Node.jsの新しい機能はV8のアップグレードによってもたらされ、 ElectronはChromeブラウザーに搭載されているV8を使用しているので、
+新しいNode.jsの重要な新しいJavaScript機能はElectronでは、すでに導入されています。
+
+## 数分後、アプリのWindow/trayが表示されなくなります
+
+これは、Window/trayを格納するのに使用している変数がガベージ コレクションされたときに発生します。
+
+この問題に遭遇した時には、次のドキュメントを読むことをお勧めします。
+
+* [Memory Management][memory-management]
+* [Variable Scope][variable-scope]
+
+もし簡単に修正したい場合は、グローバル変数を作成し、コードを変更します。
+
+変更前:
+
+```javascript
+app.on('ready', function() {
+ var tray = new Tray('/path/to/icon.png');
+})
+```
+
+変更後:
+
+```javascript
+var tray = null;
+app.on('ready', function() {
+ tray = new Tray('/path/to/icon.png');
+})
+```
+
+## ElectronでjQuery/RequireJS/Meteor/AngularJSを使用できません
+
+Electronに組み込まれているNode.jsの影響で, `module`, `exports`, `require`のようなシンボルがDOMに追加されています。いくつかのライブラリで、追加しようとしているシンボルと同じ名前があり、これが原因で問題が発生します。
+これを解決するために、Electronに組み込まれているnodeを無効にすることができます。
+
+```javascript
+// In the main process.
+var mainWindow = new BrowserWindow({
+ webPreferences: {
+ nodeIntegration: false
+ }
+});
+```
+
+しかし、Node.jsとElectron APIを使用した機能を維持したい場合は、ほかのライブラリを読み込む前に、ページのシンボルをリネームする必要があります。
+
+```html
+<head>
+<script>
+window.nodeRequire = require;
+delete window.require;
+delete window.exports;
+delete window.module;
+</script>
+<script type="text/javascript" src="jquery.js"></script>
+</head>
+```
+
+[memory-management]: https://developer.mozilla.org/en-US/docs/Web/JavaScript/Memory_Management
+[variable-scope]: https://msdn.microsoft.com/library/bzt2dkta(v=vs.94).aspx
--- /dev/null
+# アプリケーションの配布
+
+Electronでアプリケーションを配布するために、アプリケーションを`app` という名前のディレクトリにし、Electronのリソースディレクトリ(OS X では
+`Electron.app/Contents/Resources/` 、Linux と Windows では `resources/`)配下に置くべきです,
+
+OS X:
+
+```text
+electron/Electron.app/Contents/Resources/app/
+├── package.json
+├── main.js
+└── index.html
+```
+
+Windows と Linux:
+
+```text
+electron/resources/app
+├── package.json
+├── main.js
+└── index.html
+```
+
+`Electron.app` (または Linux上では、`electron`、Windows上では、 `electron.exe`)を実行すると、Electronはアプリケーションを開始します。The `electron` ディレクトリを最終的なユーザーに提供するために配布します。
+
+## ファイルにアプリケーションをパッケージングする
+
+すべてのソースコードをコピーすることでアプリケーションを提供する方法とは別に、アプリケーションのソースコードをユーザーに見えるのを避けるために、[asar](https://github.com/atom/asar) にアーカイブしてアプリケーションをパッケージ化することができます。
+
+`asar`アーカイブを使用するために、`app`フォルダーと置き換え、アーカイブファイルを`app.asar`という名前に変更する必要があり、Electronのリソースディレクトリの下に置くと、Electronはアーカイブを読み込もうとし、それを開始します。
+
+OS X:
+
+```text
+electron/Electron.app/Contents/Resources/
+└── app.asar
+```
+
+Windows と Linux:
+
+```text
+electron/resources/
+└── app.asar
+```
+
+[Application packaging](application-packaging.md)で、詳細を確認できます。
+
+## ダウンローするバイナリのブランド名の変更
+
+Electronにバンドルした後、ユーザーに配布する前に、 Electron名を変更したいでしょう。
+
+### Windows
+
+`electron.exe`を任意の名前に変更でき、[rcedit](https://github.com/atom/rcedit) または
+[ResEdit](http://www.resedit.net)のようなツールでアイコンやその他の情報を編集できます。
+
+### OS X
+
+ `Electron.app` を任意の名前に変更でき、次のファイルの `CFBundleDisplayName`と `CFBundleIdentifier`、 `CFBundleName`のフィールドの名前を変更する必要があります。
+
+* `Electron.app/Contents/Info.plist`
+* `Electron.app/Contents/Frameworks/Electron Helper.app/Contents/Info.plist`
+
+Activity Monitorで、`Electron Helper`と表示されるのを避けるために、helper appの名前を変更でき、 helper appの実行ファイルの名前を確認します。
+
+次のようなappの変更する名前の構造
+
+```
+MyApp.app/Contents
+├── Info.plist
+├── MacOS/
+│ └── MyApp
+└── Frameworks/
+ ├── MyApp Helper EH.app
+ | ├── Info.plist
+ | └── MacOS/
+ | └── MyApp Helper EH
+ ├── MyApp Helper NP.app
+ | ├── Info.plist
+ | └── MacOS/
+ | └── MyApp Helper NP
+ └── MyApp Helper.app
+ ├── Info.plist
+ └── MacOS/
+ └── MyApp Helper
+```
+
+### Linux
+
+`electron` を任意の名前に変更できます。
+
+## ソースからElectronをリビルドしてブランド名を変更する
+
+プロダクト名を変更し、ソースからビルドすることで、Electronのブランド名を変更できます。これをするために、`atom.gyp` ファイルを変更し、クリーンリビルドする必要があります。
+
+### grunt-build-atom-shell
+
+マニュアルでは、Electronのコードをダウンロードし、リビルドさせます。一方で、面倒なタスクはこれで自動化できます:
+[grunt-build-atom-shell](https://github.com/paulcbetts/grunt-build-atom-shell).
+
+This task will automatically handle editing the 自動処理を管理するのに、`.gyp`ファイルを編集し、ソースからビルドし、新しい実行名に一致したときにはNativeのNodeモジュールをリビルドするようにできます。
+
+## パッケージングツール
+
+マニュアルでパッケージ化するのとは別に、サードパーティのパッケジングツールを選ぶこともできます。
+
+* [electron-packager](https://github.com/maxogden/electron-packager)
+* [electron-builder](https://github.com/loopline-systems/electron-builder)
--- /dev/null
+# アプリケーションのパッケージ化
+
+Windows上の長いパス名周りの[issues](https://github.com/joyent/node/issues/6960) を軽減させるたり、`require`を若干スピードアップさせたり、 簡単な調査からソースコードを隠したりするために、ソースコードの少しの変更で、[asar][asar]にアーカイブし、パッケージ化を選択することもできます。
+
+## `asar` アーカイブの生成
+
+[asar][asar] アーカイブは、1つのファイルに連結されたtarライクのシンプルなフォーマットです。Electronは、すべてのファイルをアンパッキングせずに、任意のファイルを読み込めます。
+
+アプリを `asar` アーカイブにパッケージ化する手順
+
+### 1. asar ツールのインストール
+
+```bash
+$ npm install -g asar
+```
+
+### 2. `asar pack`でパッケージ化する
+
+```bash
+$ asar pack your-app app.asar
+```
+
+## `asar` アーカイブを使用する
+
+Electronには、2組のAPIがあります。Node APIは、Node.jsで提供されており、Web APIは、Chromiumで提供されています。両方のAPIは、 `asar` アーカイブからのファイル読み込みに対応しています。
+
+### Node API
+
+Electronでは特定のパッチで、`fs.readFile` や `require` のようなNode APIは、`asar` アーカイブを仮想ディレクトリのように扱い、ファイルをファイルシステムで通常のファイルのように扱います。
+
+例えば、`/path/to` 配下に、`example.asar` アーカイブがあると仮定します:
+
+```bash
+$ asar list /path/to/example.asar
+/app.js
+/file.txt
+/dir/module.js
+/static/index.html
+/static/main.css
+/static/jquery.min.js
+```
+
+`asar` アーカイブでファイルを読み込む:
+
+```javascript
+const fs = require('fs');
+fs.readFileSync('/path/to/example.asar/file.txt');
+```
+
+アーカイブのルート直下にあるすべてのファイルを一覧にする:
+
+```javascript
+const fs = require('fs');
+fs.readdirSync('/path/to/example.asar');
+```
+
+アーカイブからモジュールを使用する:
+
+```javascript
+require('/path/to/example.asar/dir/module.js');
+```
+
+ `BrowserWindow`で、`asar`アーカイブで、Webページを表示することができます:
+
+```javascript
+const BrowserWindow = require('electron').BrowserWindow;
+var win = new BrowserWindow({width: 800, height: 600});
+win.loadURL('file:///path/to/example.asar/static/index.html');
+```
+
+### Web API
+
+Webページで、アーカイブ内のファイルを `file:` プロトコルでリクエストできます。
+Node APIのように、`asar` アーカイブはディレクトリのように扱われます。
+
+例えば、 `$.get` でファイルを取得できます:
+
+```html
+<script>
+var $ = require('./jquery.min.js');
+$.get('file:///path/to/example.asar/file.txt', function(data) {
+ console.log(data);
+});
+</script>
+```
+
+### `asar` アーカイブを通常のファイルのように扱う
+
+For some cases like verifying the `asar` アーカイブのチェックサムを検証するようなケースで、 `asar` アーカイブのコンテンツをファイルのように扱う必要があります。この目的のために、 `asar` サポートしないオリジナルの `fs` API が提供する ビルトインの `original-fs` モジュールを使用できます。
+
+```javascript
+var originalFs = require('original-fs');
+originalFs.readFileSync('/path/to/example.asar');
+```
+
+`fs` モジュールで、`asar` サポートを無効化するために、`process.noAsar` を `true` に設定します:
+
+```javascript
+process.noAsar = true;
+fs.readFileSync('/path/to/example.asar');
+```
+
+## Node API の制限
+
+Node APIで、`asar` アーカイブが可能な限りディレクトリのように動作するよう懸命に試してますが、Node APIの低レベル性質の影響で、まだ制限があります。
+
+### アーカイブは読み取り専用です
+
+ファイルを変更できる全てのNode APIは、 `asar` アーカイブに対して動作しないので、アーカイブは変更されません。
+
+### 作業ディレクトリは、アーカイブ内のディレクトリに設定できません
+
+`asar` アーカイブはディレクトリのように扱われるにも関わらず、ファイルシステム上では実際のディレクトリではなく、`asar` アーカイブ内に決して作業ディレクトリは設定されません。いくつかのAPIの`cwd`オプションを設定していて、それがエラー原因になります。
+
+### いくつかのAPIで追加のアンパッキングがされます
+
+たいていの `fs` APIは、アンパッキングせずに、 `asar` アーカイブからファイルを読み込んだり、ファイル情報を取得できます。しかし、実際のファイルパスを通してシステムコールに依存するAPIもあり、Electronは必要なファイルを一時ファイルに解凍し、一時ファイルのパスを通して、APIが動作します。これは、APIに多少のオーバーヘッドがあります。
+
+追加のアンパッキングに必要なAPIです。:
+
+* `child_process.execFile`
+* `child_process.execFileSync`
+* `fs.open`
+* `fs.openSync`
+* `process.dlopen` - ネイティブモジュール上の `require` で使用されます
+
+### `fs.stat` の偽の統計情報
+
+ファイルシステム上にファイルが存在しないので、`fs.stat` および `asar` アーカイブ内のファイルへの関連情報によって返される`Stats` オブジェクトは、推測して生成されます。ファイルサイズの取得とファイルタイプのチェックを除いて、 `Stats` オブジェクトを信頼すべきではありません。
+
+### `asar` アーカイブ内でバイナリを実行します
+
+`child_process.exec` と `child_process.spawn` 、 `child_process.execFile` のようなバイナリを実行できるNode APIがあります。しかし、`execFile` だけが、`asar` アーカイブ内でのバイナリ実行をサポートしています。
+
+`exec` と `spawn` は、インプットを `file` の代わりに `command` を受け取り、`command` はシェル配下で実行されます。コマンドがasar アーカイブ内のファイルを使うかどうかを決定するための信頼できる方法はありません。影響なしで、コマンドでパスを置き換えることができるかどうかを確認することはできません。
+
+## アンパッキングする `asar` アーカイブ内のファイルを追加する
+
+上記のように、いくつかのNode APIは、呼び出さすとき、ファイルをファイルパスへアンパックします。パフォーマンス問題は別として、ウィルススキャナーのアラートにつながる可能性があります。
+
+これに対する対応として、`--unpack` オプションを使用して、アーカイブを作成する際に、いくつかのファイルをアンパックできます。例えば、ネイティブモジュールの共有ライブラリを除きます。
+
+```bash
+$ asar pack app app.asar --unpack *.node
+```
+
+このコマンドを実行した後、`app.asar` とは別に、アンパックファイルを含んだ`app.asar.unpacked` フォルダーが生成され、ユーザーに提供するときには、`app.asar` と一緒にコピーしなければなりません。
+
+[asar]: https://github.com/atom/asar
--- /dev/null
+# メインプロセスのデバッグ
+
+ブラウザウィンドウ DevToolsのみ、レンダリングプロセススクリプトをデバッグすることができます。メインプロセスからスクリプトをデバッグする方法を提供するために、Electronは、`--debug` と `--debug-brk` スイッチを提供します。
+
+## コマンドライン スイッチ
+
+Electronのメインプロセスをデバッグするために次のコマンドラインスイッチを使用します
+
+### `--debug=[port]`
+
+このスイッチを使ったとき、Electronは、 `port` 上でV8デバッガープロトコルメッセージをリッスンします。デフォルトの `port` は `5858`です。
+
+### `--debug-brk=[port]`
+
+`--debug` のようですが、最初の行でスクリプトをポーズします。
+
+## デバッグ用のnode-inspectorを使用する
+
+__Note:__ Electron は今のところ、明確にはnode-inspectorは動作せず、node-inspectorのコンソール下で、`process` オブジェクトを調査した場合、メインプロセスはクラッシュするでしょう。
+
+### 1. インストールされた[node-gyp required tools][node-gyp-required-tools] を確認する
+
+### 2. [node-inspector][node-inspector]をインストールする
+
+```bash
+$ npm install node-inspector
+```
+
+### 3. `node-pre-gyp`のパッチバージョンをインストールする
+
+```bash
+$ npm install git+https://git@github.com/enlight/node-pre-gyp.git#detect-electron-runtime-in-find
+```
+
+### 4. Electron用の `node-inspector` `v8` モジュールをリコンパイルする(対象のElectronのバージョン番号を変更する)
+
+```bash
+$ node_modules/.bin/node-pre-gyp --target=0.36.2 --runtime=electron --fallback-to-build --directory node_modules/v8-debug/ --dist-url=https://atom.io/download/atom-shell reinstall
+$ node_modules/.bin/node-pre-gyp --target=0.36.2 --runtime=electron --fallback-to-build --directory node_modules/v8-profiler/ --dist-url=https://atom.io/download/atom-shell reinstall
+```
+
+[How to install native modules](how-to-install-native-modules)を見る。
+
+### 5. Electron用のデバッグモードを有効にする
+
+デバッグフラッグでElectronを開始する:
+
+```bash
+$ electron --debug=5858 your/app
+```
+
+または、最初のライン上でスクリプトをポーズする:
+
+```bash
+$ electron --debug-brk=5858 your/app
+```
+
+### 5. Electronを使用して、[node-inspector][node-inspector] サーバーを開始する
+
+```bash
+$ ELECTRON_RUN_AS_NODE=true path/to/electron.exe node_modules/node-inspector/bin/inspector.js
+```
+
+### 6. デバッグUIを読み込みます
+
+Chromeブラウザで、 http://127.0.0.1:8080/debug?ws=127.0.0.1:8080&port=5858 を開きます。エントリーラインを見るために、debug-brkを始めるには、ポーズをクリックします。
+
+[node-inspector]: https://github.com/node-inspector/node-inspector
+[node-gyp-required-tools]: https://github.com/nodejs/node-gyp#installation
+[how-to-install-native-modules]: using-native-node-modules.md#how-to-install-native-modules
--- /dev/null
+# デスクトップ環境の統合
+
+異なるオペレーティングシステムは、それぞれのデスクトップ環境でデスクトップに統合されたアプリケーション用に異なる機能を提供します。例えば、Windows アプリケーションではタスクバーのジャンプバーリストにショートカットをおけ、Macではドックメニューにカスタムメニューをおけます。
+
+このガイドでは、Electron APIでデスクトップ環境にアプリケーションを統合する方法を説明します。
+
+## 通知 (Windows, Linux, OS X)
+
+3つのオペレーティングシステム全てで、アプリケーションからユーザーに通知を送る手段が提供されています。通知を表示するためにオペレーティングシステムのネイティブ通知APIを使用しする[HTML5 Notification API](https://notifications.spec.whatwg.org/)で、Electronは、開発者に通知を送ることができます。
+
+```javascript
+var myNotification = new Notification('Title', {
+ body: 'Lorem Ipsum Dolor Sit Amet'
+});
+
+myNotification.onclick = function () {
+ console.log('Notification clicked')
+}
+```
+
+オペレーティングシステム間でコードとユーザ体験は似ていますが、細かい違いがあります。
+
+### Windows
+
+* Windows 10では、通知はすぐに動作します。
+* Windows 8.1 と Windows 8では、[Application User
+Model ID][app-user-model-id]で、アプリへのショートカットはスタートメニューにインストールされます。しかし、スタートメニューにピン止めをする必要がありません。
+* Windows 7以前は、通知はサポートされていません。 しかし、[Tray API](tray-balloon)を使用してバルーンヒントを送信することができます。
+
+通知にイメージを使うために、通知オプションの `icon` プロパティにローカルのイメージファイル(`png`が望ましい)を設定します。 正しくない、または`http/https`の URLを設定した場合でも、通知は表示されますが、イメージは表示されません。
+
+```javascript
+new Notification('Title', {
+ body: 'Notification with icon',
+ icon: 'file:///C:/Users/feriese/Desktop/icon.png'
+});
+```
+
+その上で、bodyの最大サイズは250文字であることに留意してください。Windowsチームは、通知は200文字にすることを推奨しています。
+
+### Linux
+
+通知は、`libnotify`を使用して送信されます。[デスクトップ通知仕様][notification-spec]に対応したデスクトップ環境上(Cinnamon、Enlightenment、Unity、GNOME、KDEなど)で通知を表示できます。
+
+### OS X
+
+通知は、そのままOS Xに通知されます。しかし、[通知に関するAppleのヒューマンインターフェイスガイドライン(英語版)](https://developer.apple.com/library/mac/documentation/UserExperience/Conceptual/OSXHIGuidelines/NotificationCenter.html)を知っておくべきです。
+
+通知は、256バイトサイズに制限されており、制限を超えていた場合、通知が破棄されます。
+
+## 最近のドキュメント (Windows と OS X)
+
+Windows と OS Xは、ジャンプリストやドックメニュー経由で、アプリケーションが開いた最近のドキュメント一覧に簡単にアクセスできます。
+
+__JumpList:__
+
+
+
+__Application dock menu:__
+
+<img src="https://cloud.githubusercontent.com/assets/639601/5069610/2aa80758-6e97-11e4-8cfb-c1a414a10774.png" height="353" width="428" >
+
+最近のドキュメントにファイルを追加するために、[app.addRecentDocument][addrecentdocument] APIを使用できます:
+
+```javascript
+app.addRecentDocument('/Users/USERNAME/Desktop/work.type');
+```
+
+[app.clearRecentDocuments][clearrecentdocuments] API を使用して、最近のドキュメント一覧を空にできます:
+
+```javascript
+app.clearRecentDocuments();
+```
+
+### Windows 留意点
+
+Windows で、この機能を使用できるようにするために、アプリケーションにドキュメントのファイルタイプのハンドラーを登録すべきです。さもなければ、ジャンプリストに表示されません。[Application Registration][app-registration]で、登録しているアプリケーションをすべて見れます。
+
+ユーザーがジャンプリストからファイルをクリックしたとき、アプリケーションの新しいインスタンスは、コマンドライン引数にファイルのパスを渡して開始します。
+
+### OS X 留意点
+
+ファイルが最近のドキュメントメニューからリクエストされた時、 `app` モジュールの `open-file` イベントが発行されます。
+
+## ドックメニュー (OS X)のカスタマイズ
+
+通常アプリケーションで使用する共通機能用のショートカットを含める、ドック用のカスタムメニューをOS Xでは指定できます。
+
+__Dock menu of Terminal.app:__
+
+<img src="https://cloud.githubusercontent.com/assets/639601/5069962/6032658a-6e9c-11e4-9953-aa84006bdfff.png" height="354" width="341" >
+
+カスタムドックメニューを設定するために、OS Xのみに提供されている `app.dock.setMenu` APIを使用できます。
+
+```javascript
+const electron = require('electron');
+const app = electron.app;
+const Menu = electron.Menu;
+
+var dockMenu = Menu.buildFromTemplate([
+ { label: 'New Window', click: function() { console.log('New Window'); } },
+ { label: 'New Window with Settings', submenu: [
+ { label: 'Basic' },
+ { label: 'Pro'}
+ ]},
+ { label: 'New Command...'}
+]);
+app.dock.setMenu(dockMenu);
+```
+
+## ユーザータスク (Windows)
+
+Windowsでは、ジャンプリストの `Tasks` カテゴリでカスタムアクションを指定できます。
+MSDNから引用します。
+
+>アプリケーションでは、プログラムの機能とユーザーがプログラムを使用して実行する可能性が最も高い主な操作の両方に基づいてタスクを定義します。タスクを実行するためにアプリケーションが起動している必要がないように、タスクは状況に依存しないものにする必要があります。また、タスクは、一般的なユーザーがアプリケーションで実行する操作の中で、統計上最も一般的な操作です。たとえば、メール プログラムでは電子メールの作成や予定表の表示、ワード プロセッサでは新しい文書の作成、特定のモードでのアプリケーションの起動、アプリケーションのサブコマンドを実行することなどです。一般的なユーザーが必要としない高度な機能や、登録などの 1 回限りの操作によって、メニューがわかりづらくなることがないようにしてください。アップグレードやキャンペーンなどの販売促進用の項目としてタスクを使用しないでください。
+
+>タスク一覧は静的なものにすることを強くお勧めします。アプリケーションの状態や状況に関係なく、タスク一覧は同じ状態にすることをお勧めします。リストを動的に変更することも可能ですが、ユーザーはターゲット一覧のこの部分が変更されると考えていないので、ユーザーを混乱させる可能性があることを考慮してください。
+
+__Internet Explorerのタスク:__
+
+
+
+実際のメニューであるOS Xのドックメニューとは異なり、ユーザーがタスクをクリックしたとき、Windowsではユーザータスクはアプリケーションのショートカットのように動作し、プログラムは指定された引数を実行します。
+
+アプリケーション用のユーザータスクを設定するために、[app.setUserTasks][setusertaskstasks] APIを使用できます:
+
+```javascript
+app.setUserTasks([
+ {
+ program: process.execPath,
+ arguments: '--new-window',
+ iconPath: process.execPath,
+ iconIndex: 0,
+ title: 'New Window',
+ description: 'Create a new window'
+ }
+]);
+```
+
+タスクリストをクリアするために、`app.setUserTasks` をコールし、配列を空にします。
+
+```javascript
+app.setUserTasks([]);
+```
+
+アプリケーションを閉じた後もユーザータスクは表示されていてるので、アプリケーションをアンインストールするまではタスクに指定したアイコンとプログラムのパスは存在し続けてる必要があります。
+
+## サムネイルツールバー(縮小表示ツールバー)
+
+Windowsでは、アプリケーションウィンドウのタスクバーレイアウトに、指定のボタンを縮小表示ツールバーに追加できます。アプリケーションのウィンドウを元のサイズに戻したりアクティブ化したりすることなく、主要なコマンドにアクセスできるようにします。
+
+MSDNからの引用:
+
+>このツール バーは、単純に、使い慣れた標準的なツール バー コモン コントロールです。最大で 7 個のボタンが配置されます。各ボタンの ID、イメージ、ツールヒント、および状態は構造体で定義され、その後タスク バーに渡されます。アプリケーションでは、現在の状態での必要に応じて、縮小表示ツール バーのボタンの表示、有効化、無効化、非表示を実行できます。
+>たとえば、Windows Media Player の縮小表示ツール バーでは、再生、一時停止、ミュート、停止などの、標準的なメディア トランスポート コントロールを提供できます。
+
+__Windows Media Playerの縮小表示ツールバー:__
+
+
+
+アプリケーションに縮小表示ツールバーを設定するために、[BrowserWindow.setThumbarButtons][setthumbarbuttons]を使えます:
+
+```javascript
+const BrowserWindow = require('electron').BrowserWindow;
+const path = require('path');
+
+var win = new BrowserWindow({
+ width: 800,
+ height: 600
+});
+win.setThumbarButtons([
+ {
+ tooltip: "button1",
+ icon: path.join(__dirname, 'button1.png'),
+ click: function() { console.log("button2 clicked"); }
+ },
+ {
+ tooltip: "button2",
+ icon: path.join(__dirname, 'button2.png'),
+ flags:['enabled', 'dismissonclick'],
+ click: function() { console.log("button2 clicked."); }
+ }
+]);
+```
+
+縮小表示ツールバーボタンをクリアするために、 `BrowserWindow.setThumbarButtons` をコールして配列を空にします:
+
+```javascript
+win.setThumbarButtons([]);
+```
+
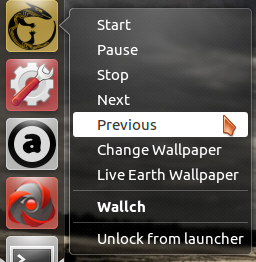
+## Unity ランチャーショートカット (Linux)
+
+Unityでは、`.desktop` ファイルの修正を経由してランチャーにカスタムエントリーを追加できます。[Adding Shortcuts to a Launcher][unity-launcher]を参照してください。
+
+__Audaciousのランチャーショートカット:__
+
+
+
+## タスクバーの進行状況バー (Windows & Unity)
+
+Windowsでは、タスクバーボタンは、進行状況バーを表示するのに使えます。ウィンドウを切り替えることなくウィンドウの進行状況情報をユーザーに提供することができます。
+
+Unity DEは、ランチャーに進行状況バーの表示をするのと同様の機能を持っています。
+
+__タスクバーボタン上の進行状況バー:__
+
+
+
+__Unityランチャーでの進行状況バー:__
+
+
+
+ウィンドウに進行状況バーを設定するために、[BrowserWindow.setProgressBar][setprogressbar] APIを使えます:
+
+```javascript
+var window = new BrowserWindow({...});
+window.setProgressBar(0.5);
+```
+
+## Windowのファイル表示 (OS X)
+
+OS Xでは、ウィンドウがrepresented fileを設定でき、タイトルバー上にファイルのアイコンを表示でき、タイトル上でCommand-クリックまたはControl-クリックをすると、パスがポップアップ表示されます。
+
+ウィンドウの編集状態を設定できるように、このウィンドウのドキュメントが変更されたかどうかをファイルのアイコンで示せます。
+
+__Represented file ポップアップメニュー:__
+
+<img src="https://cloud.githubusercontent.com/assets/639601/5082061/670a949a-6f14-11e4-987a-9aaa04b23c1d.png" height="232" width="663" >
+
+ウィンドウにrepresented fileを設定するために、[BrowserWindow.setRepresentedFilename][setrepresentedfilename] と [BrowserWindow.setDocumentEdited][setdocumentedited] APIsを使えます:
+
+```javascript
+var window = new BrowserWindow({...});
+window.setRepresentedFilename('/etc/passwd');
+window.setDocumentEdited(true);
+```
+
+[addrecentdocument]: ../api/app.md#appaddrecentdocumentpath
+[clearrecentdocuments]: ../api/app.md#appclearrecentdocuments
+[setusertaskstasks]: ../api/app.md#appsetusertaskstasks
+[setprogressbar]: ../api/browser-window.md#browserwindowsetprogressbarprogress
+[setrepresentedfilename]: ../api/browser-window.md#browserwindowsetrepresentedfilenamefilename
+[setdocumentedited]: ../api/browser-window.md#browserwindowsetdocumenteditededited
+[app-registration]: http://msdn.microsoft.com/en-us/library/windows/desktop/ee872121(v=vs.85).aspx
+[unity-launcher]: https://help.ubuntu.com/community/UnityLaunchersAndDesktopFiles#Adding_shortcuts_to_a_launcher
+[setthumbarbuttons]: ../api/browser-window.md#browserwindowsetthumbarbuttonsbuttons
+[tray-balloon]: ../api/tray.md#traydisplayballoonoptions-windows
+[app-user-model-id]: https://msdn.microsoft.com/en-us/library/windows/desktop/dd378459(v=vs.85).aspx
+[notification-spec]: https://developer.gnome.org/notification-spec/
--- /dev/null
+# DevTools 拡張
+
+簡単にデバッグをするために、Electronは[Chrome DevTools Extension][devtools-extension]に基本的な対応しています。
+
+DevToolsエクステンションのために、ソースコードをダウンローし、`BrowserWindow.addDevToolsExtension` APIを使って読み込みます。読み込んだエクステンションは維持されているので、ウィンドウを作成するとき、毎回APIをコールする必要はありません。
+
+** NOTE: React DevTools は動作しません。issue https://github.com/atom/electron/issues/915 でフォローしています**
+
+例えば、[React DevTools Extension](https://github.com/facebook/react-devtools)を使うために、最初にソースコードをダウンロードする必要があります。
+
+```bash
+$ cd /some-directory
+$ git clone --recursive https://github.com/facebook/react-devtools.git
+```
+
+エクステンションをビルドするために、[`react-devtools/shells/chrome/Readme.md`](https://github.com/facebook/react-devtools/blob/master/shells/chrome/Readme.md)を参照してください。
+
+複数のウィンドウで、DevToolsを開くために、Electronでエクステンションをロードし、DevToolsコンソールで次のコードを実行します。
+
+```javascript
+const BrowserWindow = require('electron').remote.BrowserWindow;
+BrowserWindow.addDevToolsExtension('/some-directory/react-devtools/shells/chrome');
+```
+
+エクステンションをアンロードするために、名前と`BrowserWindow.removeDevToolsExtension` APIをコールすると、次回DevToolsを開いた時にはロードされません。
+
+```javascript
+BrowserWindow.removeDevToolsExtension('React Developer Tools');
+```
+
+## DevTools エクステンションのフォーマット
+
+理想的には、Chromeブラウザー用に書かれたすべてのDevToolsエクステンションをElectronがロードできることですが、それらはプレーンディレクトリにある必要があります。`crx` エクステンションパッケージは、ディレクトリに解凍できる方法がなければ、Electronはロードする方法はありません。
+
+## バックグラウンドページ
+
+今のところ、ElectronはChromエクステンションのバックグラウンドページ機能に対応していません。そのため、Electronでは、この機能に依存するDevToolsエクステンションは動作しません。
+
+## `chrome.*` APIs
+
+いくつかのChromeエクステンションは、`chrome.*` APIsを使用しており、ElectronでそれらのAPIを実装するための努力をしていますが、すべては実装されていません。
+
+すべては実装されていない`chrome.*` APIについて考えると、もしDevToolsエクステンションが `chrome.devtools.*` 以外のAPIを使用していると、エクステンションは動作しない可能性が非常に高いです。
+
+[devtools-extension]: https://developer.chrome.com/extensions/devtools
--- /dev/null
+# Mac App Store Submission Guide
+
+v0.34.0から、ElectronはMac App Store (MAS)にパッケージ化したアプリを登録することができます。このガイドでは、MASビルド用の制限とアプリを登録する方法についての情報を提供します。
+
+__Note:__ Mac App Storeにアプリを登録するには、費用が発生する[Apple Developer Program][developer-program]に登録する必要があります。
+
+## アプリを登録する方法
+
+次の手順は、Mac App Sotreにアプリを登録する簡単な手順を説明します。しかし、これらの手順はAppleによってAppが承認されることを保証するものではありません。Mac App Storeの要件については、Appleの[Submitting Your App][submitting-your-app]ガイドを読んでおく必要があります。
+
+### 証明書の取得
+
+Mac App StoreにAppを登録するには、最初にAppleから証明書を取得しなければありません。Web上で、[existing guides][nwjs-guide] を参照してください。
+
+### アプリケーションの署名
+
+Appleから証明書を取得した後、[Application Distribution](application-distribution.md)を参照してアプリをパッケージ化し、アプリに証明をします。この手順は、基本的にほかのプログラムと同じですが、Electronが依存するすべてに1つ1つサインします。
+
+最初に、2つの資格ファイルを用意する必要があります。
+
+`child.plist`:
+
+```xml
+<?xml version="1.0" encoding="UTF-8"?>
+<!DOCTYPE plist PUBLIC "-//Apple//DTD PLIST 1.0//EN" "http://www.apple.com/DTDs/PropertyList-1.0.dtd">
+<plist version="1.0">
+ <dict>
+ <key>com.apple.security.app-sandbox</key>
+ <true/>
+ <key>com.apple.security.inherit</key>
+ <true/>
+ </dict>
+</plist>
+```
+
+`parent.plist`:
+
+```xml
+<?xml version="1.0" encoding="UTF-8"?>
+<!DOCTYPE plist PUBLIC "-//Apple//DTD PLIST 1.0//EN" "http://www.apple.com/DTDs/PropertyList-1.0.dtd">
+<plist version="1.0">
+ <dict>
+ <key>com.apple.security.app-sandbox</key>
+ <true/>
+ </dict>
+</plist>
+```
+
+次のスクリプトでアプリをサインします。
+
+```bash
+#!/bin/bash
+
+# Name of your app.
+APP="YourApp"
+# The path of you app to sign.
+APP_PATH="/path/to/YouApp.app"
+# The path to the location you want to put the signed package.
+RESULT_PATH="~/Desktop/$APP.pkg"
+# The name of certificates you requested.
+APP_KEY="3rd Party Mac Developer Application: Company Name (APPIDENTITY)"
+INSTALLER_KEY="3rd Party Mac Developer Installer: Company Name (APPIDENTITY)"
+
+FRAMEWORKS_PATH="$APP_PATH/Contents/Frameworks"
+
+codesign --deep -fs "$APP_KEY" --entitlements child.plist "$FRAMEWORKS_PATH/Electron Framework.framework/Libraries/libnode.dylib"
+codesign --deep -fs "$APP_KEY" --entitlements child.plist "$FRAMEWORKS_PATH/Electron Framework.framework/Electron Framework"
+codesign --deep -fs "$APP_KEY" --entitlements child.plist "$FRAMEWORKS_PATH/Electron Framework.framework/"
+codesign --deep -fs "$APP_KEY" --entitlements child.plist "$FRAMEWORKS_PATH/$APP Helper.app/"
+codesign --deep -fs "$APP_KEY" --entitlements child.plist "$FRAMEWORKS_PATH/$APP Helper EH.app/"
+codesign --deep -fs "$APP_KEY" --entitlements child.plist "$FRAMEWORKS_PATH/$APP Helper NP.app/"
+codesign -fs "$APP_KEY" --entitlements parent.plist "$APP_PATH"
+productbuild --component "$APP_PATH" /Applications --sign "$INSTALLER_KEY" "$RESULT_PATH"
+```
+
+OS Xで、サンドボックスにアプリを新しく追加した場合、基本的な考え方は、Appleの[Enabling App Sandbox][enable-app-sandbox]を読み、エンタイトルメントファイルにアプリに必要なパーミッションキーを追加します。
+
+### Appをアップロードし、レビューに登録する
+
+アプリに署名後、iTunes ConnectにアップロードするためにApplication Loaderを使用できます。アップロードする前に[created a record][create-record]を確認してください。そして[レビュー用にアプリを登録できます][submit-for-review].
+
+## MAS Buildの制限
+
+アプリのサンドボックスですべての要件を満たすために、MASビルドで次のモジュールを無効にしてください。
+
+* `crash-reporter`
+* `auto-updater`
+
+次の挙動を変更してください。
+
+* ビデオキャプチャーはいくつかのマシンで動作しないかもしれません。
+* 一部のアクセシビリティ機能が動作しないことがあります。
+* アプリはDNSの変更を認識しません。
+
+アプリのサンドボックスでの使用が原因で、アプリがアクセスできるリソースは厳密に制限されています。詳細は、 [App Sandboxing][app-sandboxing] を参照してください。
+
+[developer-program]: https://developer.apple.com/support/compare-memberships/
+[submitting-your-app]: https://developer.apple.com/library/mac/documentation/IDEs/Conceptual/AppDistributionGuide/SubmittingYourApp/SubmittingYourApp.html
+[nwjs-guide]: https://github.com/nwjs/nw.js/wiki/Mac-App-Store-%28MAS%29-Submission-Guideline#first-steps
+[enable-app-sandbox]: https://developer.apple.com/library/ios/documentation/Miscellaneous/Reference/EntitlementKeyReference/Chapters/EnablingAppSandbox.html
+[create-record]: https://developer.apple.com/library/ios/documentation/LanguagesUtilities/Conceptual/iTunesConnect_Guide/Chapters/CreatingiTunesConnectRecord.html
+[submit-for-review]: https://developer.apple.com/library/ios/documentation/LanguagesUtilities/Conceptual/iTunesConnect_Guide/Chapters/SubmittingTheApp.html
+[app-sandboxing]: https://developer.apple.com/app-sandboxing/
--- /dev/null
+# オンライン/オフライン イベントの検知
+
+
+
+オンラインとオフラインイベントの検知は、標準のHTML 5 APIを使用して、状況表示を実装できます。次の例を見てみましょう。
+
+_main.js_
+
+```javascript
+const electron = require('electron');
+const app = electron.app;
+const BrowserWindow = electron.BrowserWindow;
+
+var onlineStatusWindow;
+app.on('ready', function() {
+ onlineStatusWindow = new BrowserWindow({ width: 0, height: 0, show: false });
+ onlineStatusWindow.loadURL('file://' + __dirname + '/online-status.html');
+});
+```
+
+_online-status.html_
+
+```html
+<!DOCTYPE html>
+<html>
+<body>
+<script>
+ var alertOnlineStatus = function() {
+ window.alert(navigator.onLine ? 'online' : 'offline');
+ };
+
+ window.addEventListener('online', alertOnlineStatus);
+ window.addEventListener('offline', alertOnlineStatus);
+
+ alertOnlineStatus();
+</script>
+</body>
+</html>
+```
+
+メインプロセスでそれらのイベントに反応するインスタンスがあるかもしれません。メインプロセスは、`navigator` オブジェクトをもたず、直接それらのイベントを検知できません。Electronの内部プロセスコミュニケーションツールを使用して、イベントはメインプロセスに転送され、必要があればハンドルできます。次の例を見てみましょう。
+
+_main.js_
+
+```javascript
+const electron = require('electron');
+const app = electron.app;
+const ipcMain = electron.ipcMain;
+const BrowserWindow = electron.BrowserWindow;
+
+var onlineStatusWindow;
+app.on('ready', function() {
+ onlineStatusWindow = new BrowserWindow({ width: 0, height: 0, show: false });
+ onlineStatusWindow.loadURL('file://' + __dirname + '/online-status.html');
+});
+
+ipcMain.on('online-status-changed', function(event, status) {
+ console.log(status);
+});
+```
+
+_online-status.html_
+
+```html
+<!DOCTYPE html>
+<html>
+<body>
+<script>
+ const ipcRenderer = require('electron').ipcRenderer;
+ var updateOnlineStatus = function() {
+ ipcRenderer.send('online-status-changed', navigator.onLine ? 'online' : 'offline');
+ };
+
+ window.addEventListener('online', updateOnlineStatus);
+ window.addEventListener('offline', updateOnlineStatus);
+
+ updateOnlineStatus();
+</script>
+</body>
+</html>
+```
--- /dev/null
+# サポートするプラットフォーム
+
+Electronでは次のプラットフォームをサポートします。
+
+### OS X
+
+OS X用に提供しているバイナリは64bitのみで、サポートするOS Xのバージョンは、OS X 10.8 以降です。
+
+### Windows
+
+Windows 7 以降をサポートしており、それ以前のオペレーティングシステムはサポートしていません(し、動作しません)。
+
+`x86` と `amd64` (x64) の両方のバイナリが、Windows用に提供しています。
+ただし、`ARM` バージョンのWindowsは今のところサポートしていません。
+
+### Linux
+
+`ia32`(`i686`) と `x64`(`amd64`) のビルド済みバイナリは、Ubuntu 12.04上でビルドされ、`arm` バイナリは、Debian Wheezy用のhard-float ABIとNEONのARM v7を対象にビルドしています。
+
+Electronはビルドプラットフォームにリンクされているので、ディストリビューションに同梱されているライブラリに依存しているかどうかに関係なくディストリビューション上で動作します。そのため Ubuntu 12.04 のみを動作保証しますが、次のプラットフォームについてもビルド済みのElectronバイナリを実行できるか検証します。
+
+* Ubuntu 12.04 以降
+* Fedora 21
+* Debian 8
--- /dev/null
+# ネイティブのNodeモジュールを使用する
+
+Electronは、ネイティブのNodeモジュールをサポートしていますが、Node公式とは異なるV8バージョンを使用しているので、ネイティブモジュールでビルドする時、Electronのヘッダーで指定する必要があります。
+
+## ネイティブNodeモジュールとの互換性
+
+Nodeが新しいV8バージョンを使用し始めた時、Nativeモジュールは動作しなくなるかもしれません。ElectronでNativeモジュールが動作するかどうかを確認するために、Electronで使用する内部のNodeバージョンがサポートしているかを確認すべきです。ElectronでNodeが使用しているバージョンを確認するには、[releases](https://github.com/atom/electron/releases)ページを見るか、`process.version` (例えば [Quick Start](https://github.com/atom/electron/blob/master/docs/tutorial/quick-start.md)を見てください)を使用してください。
+
+Nodeの複数バージョンを簡単にサポートできるので、あなたのモジュールに [NAN](https://github.com/nodejs/nan/) を使うことを検討してください。古いバージョンからElectronで動作するNodeの新しいバージョンへ移植するのに役立ちます。
+
+## ネイティブモジュールのインストール方法
+
+ネイティブモジュールをインストールするための3つの方法:
+
+### 簡単な方法
+
+ヘッダーをダウンロードし、ネイティブモジュールをビルドする手順をマニュアルで管理する、[`electron-rebuild`](https://github.com/paulcbetts/electron-rebuild) パッケージ経由で、ネイティブモジュールをリビルドするのが最も簡単な方法です。
+
+```sh
+npm install --save-dev electron-rebuild
+
+# Every time you run "npm install", run this
+./node_modules/.bin/electron-rebuild
+
+# On Windows if you have trouble, try:
+.\node_modules\.bin\electron-rebuild.cmd
+```
+
+### npmを使う方法
+
+モジュールをインストールするために`npm` を使用できます。環境変数の設定を除いて、Nodeモジュールと完全に同じ手順です。
+
+```bash
+export npm_config_disturl=https://atom.io/download/atom-shell
+export npm_config_target=0.33.1
+export npm_config_arch=x64
+export npm_config_runtime=electron
+HOME=~/.electron-gyp npm install module-name
+```
+
+### node-gypを使う方法
+
+ElectronのヘッダーでNodeモジュールをビルドするために、どこからヘッダーをダウンロードするかとどのバージョンを使用するかを選択して`node-gyp`を実行する必要があります。
+
+```bash
+$ cd /path-to-module/
+$ HOME=~/.electron-gyp node-gyp rebuild --target=0.29.1 --arch=x64 --dist-url=https://atom.io/download/atom-shell
+```
+
+開発ヘッダーを探し、 `HOME=~/.electron-gyp` を変更します。`--target=0.29.1`がElectronのバージョンです。 `--dist-url=...` で、どこからヘッダーをダウンロードするかを指定します。`--arch=x64`を使用して、64bit システム用にモジュールをビルドします。
--- /dev/null
+# Pepper Flash プラグインを使用する
+
+Electronは、Pepper Flashプラグインをサポートしています。ElectronでPepper Flashプラグインを使用するために、マニュアルでPepper Flashプラグインのパスを指定し、アプリケーションで有効化しなければなりません。
+
+Electron now supports the Pepper Flash plugin. To use the Pepper Flash plugin in
+
+## Flash プラグインのコピー準備
+
+OS XとLinuxでは、Pepper Flashプラグインの詳細は、Chromeブラウザーで、`chrome://plugins` にアクセスして確認できます。そこで表示されるパスとバージョンは、ElectronのPepper Flashサポートに役立ちます。それを別のパスにコピーすることができます。
+
+## Electron スイッチの追加
+
+直接、Electronコマンドラインに`--ppapi-flash-path` と `ppapi-flash-version` を追加するか、 アプリのreadyイベントの前に、`app.commandLine.appendSwitch`メソッドを使用します。`browser-window`の`plugins`スイッチを追加します。
+
+例:
+
+```javascript
+// Specify flash path.
+// On Windows, it might be /path/to/pepflashplayer.dll
+// On OS X, /path/to/PepperFlashPlayer.plugin
+// On Linux, /path/to/libpepflashplayer.so
+app.commandLine.appendSwitch('ppapi-flash-path', '/path/to/libpepflashplayer.so');
+
+// Specify flash version, for example, v17.0.0.169
+app.commandLine.appendSwitch('ppapi-flash-version', '17.0.0.169');
+
+app.on('ready', function() {
+ mainWindow = new BrowserWindow({
+ 'width': 800,
+ 'height': 600,
+ 'web-preferences': {
+ 'plugins': true
+ }
+ });
+ mainWindow.loadURL('file://' + __dirname + '/index.html');
+ // Something else
+});
+```
+
+## `<webview>` タグでFlashプラグインを有効か
+
+`<webview>` タグに`plugins`属性を追加する
+
+```html
+<webview src="http://www.adobe.com/software/flash/about/" plugins></webview>
+```
--- /dev/null
+# Selenium と WebDriverを使用する
+
+[ChromeDriver - WebDriver for Chrome][chrome-driver]より:
+
+> WebDriverは、複数のブラウザ間でWebアプリの自動テストをするためのオープンソースツールです。Webページの移動、ユーザー入力、JavaScriptの実行などを可能にします。ChromeDriverはChromium用のWebDriverのワイヤープロトコルで実装されたスタンドアロンサーバーです。ChromiumとWebDriverチームメンバーが開発しています。
+
+Electronで `chromedriver` を使用するために、Electronがどこにあるかを示し、ElectronはChromeブラウザーであると思わせます。
+
+## WebDriverJsを設定します
+
+[WebDriverJs](https://code.google.com/p/selenium/wiki/WebDriverJs) は、web driver でテストするためのNodeパッケージを提供します。例のように使用します。
+
+### 1. ChromeDriverを開始
+
+最初に、 `chromedriver` バイナリをダウンロードし、実行します:
+
+```bash
+$ ./chromedriver
+Starting ChromeDriver (v2.10.291558) on port 9515
+Only local connections are allowed.
+```
+
+ポート番号 `9515`を覚えておいてください、あとで使用します。
+
+### 2. WebDriverJSのインストール
+
+```bash
+$ npm install selenium-webdriver
+```
+
+### 3. ChromeDriverに接続する
+
+Electronでの `selenium-webdriver` 使用方法は、chrome driverへの接続方法とElectronバイナリがどこにあるかをマニュアルで指定する以外は、upstreamと基本的に同じです。
+
+```javascript
+const webdriver = require('selenium-webdriver');
+
+var driver = new webdriver.Builder()
+ // The "9515" is the port opened by chrome driver.
+ .usingServer('http://localhost:9515')
+ .withCapabilities({
+ chromeOptions: {
+ // Here is the path to your Electron binary.
+ binary: '/Path-to-Your-App.app/Contents/MacOS/Atom',
+ }
+ })
+ .forBrowser('electron')
+ .build();
+
+driver.get('http://www.google.com');
+driver.findElement(webdriver.By.name('q')).sendKeys('webdriver');
+driver.findElement(webdriver.By.name('btnG')).click();
+driver.wait(function() {
+ return driver.getTitle().then(function(title) {
+ return title === 'webdriver - Google Search';
+ });
+}, 1000);
+
+driver.quit();
+```
+
+## WebdriverIOのセットアップをする
+
+[WebdriverIO](http://webdriver.io/) は、web driverでテストするNodeパッケージを提供します。
+
+### 1. ChromeDriverを開始する
+
+最初に、 `chromedriver` バイナリをダウンロードし、実行します。:
+
+```bash
+$ chromedriver --url-base=wd/hub --port=9515
+Starting ChromeDriver (v2.10.291558) on port 9515
+Only local connections are allowed.
+```
+
+ポート番号 `9515`を覚えておいてください、あとで使用します。
+
+### 2. WebdriverIOをインストールする
+
+```bash
+$ npm install webdriverio
+```
+
+### 3. chrome driverに接続する
+
+```javascript
+const webdriverio = require('webdriverio');
+var options = {
+ host: "localhost", // Use localhost as chrome driver server
+ port: 9515, // "9515" is the port opened by chrome driver.
+ desiredCapabilities: {
+ browserName: 'chrome',
+ chromeOptions: {
+ binary: '/Path-to-Your-App/electron', // Path to your Electron binary.
+ args: [/* cli arguments */] // Optional, perhaps 'app=' + /path/to/your/app/
+ }
+ }
+};
+
+var client = webdriverio.remote(options);
+
+client
+ .init()
+ .url('http://google.com')
+ .setValue('#q', 'webdriverio')
+ .click('#btnG')
+ .getTitle().then(function(title) {
+ console.log('Title was: ' + title);
+ })
+ .end();
+```
+
+## ワークフロー
+
+Electronはリビルドせずにアプリケーションをテストするために、単純にElectronのリソースディレクトリでアプリのソースを[配置します](https://github.com/atom/electron/blob/master/docs/tutorial/application-distribution.md)。
+
+もしくは、アプリのフォルダーを引数にしてElectronバイナリを実行します。これは、Electronのリソースディレクトリにアプリをコピー&ペーストする必要性を除きます。
+
+[chrome-driver]: https://sites.google.com/a/chromium.org/chromedriver/
--- /dev/null
+# Widevine CDM Pluginを使用する
+
+Electronで、Chromeブラウザーに同梱される Widevine CDMプラグインを使用できます。
+
+## プラグインを取得する
+
+Electronは、ライセンス的な理由でWidevine CDMプラグインは同梱されません。Widevine CDMプラグインを取得するために、最初に、使用するElectronビルドのChromバージョンとアーキテクチャを合わせた公式のChromeブラウザーをインストールする必要があります。
+
+### Windows & OS X
+
+Chromeブラウザーで、`chrome://components/`を開き、 `WidevineCdm` を探し、それが最新であることを確認し、`APP_DATA/Google/Chrome/WidevineCDM/VERSION/_platform_specific/PLATFORM_ARCH/`ディレクトリからすべてのプラグインバイナリを探します。
+
+`APP_DATA` は、アプリデータを格納するシステムロケーションです。Windowsでは`%LOCALAPPDATA%`、OS Xでは`~/Library/Application Support`です。`VERSION` は、Widevine CDM プラグインのバージョン文字列で、 `1.4.8.866`のような文字列が格納されます。`PLATFORM` は、 `mac` か `win`です。`ARCH` は `x86` か `x64`です。
+
+Windowsでは、`widevinecdm.dll` と `widevinecdmadapter.dll`が必要で、OS Xでは、`libwidevinecdm.dylib` と `widevinecdmadapter.plugin`です。任意の場所にコピーできますが、一緒に配置する必要があります。
+
+### Linux
+
+Linux上では、プラグインバイナリは、Chromeブラウザーにいっほに格納され、 `/opt/google/chrome` 配下にあり、ファイル名は `libwidevinecdm.so` と `libwidevinecdmadapter.so`です。
+
+## プラグインを使用する
+
+プラグインファイルを取得した後、Electronoの`--widevine-cdm-path`コマンドラインスイッチで`widevinecdmadapter`のパスを指定し、`--widevine-cdm-version`スイッチでプラグインのバージョンを指定します。
+
+__Note:__ `widevinecdmadapter` バイナリはElectronにパスが通っていても`widevinecdm` バイナリはそこに置く必要があります。
+
+コマンドラインスイッチは、`app`モジュールの`ready`イベントが発火する前に通り、プラグインが使用するページは、プラグインを有効にしなければなりません。
+
+サンプルコード:
+
+```javascript
+// You have to pass the filename of `widevinecdmadapter` here, it is
+// * `widevinecdmadapter.plugin` on OS X,
+// * `libwidevinecdmadapter.so` on Linux,
+// * `widevinecdmadapter.dll` on Windows.
+app.commandLine.appendSwitch('widevine-cdm-path', '/path/to/widevinecdmadapter.plugin');
+// The version of plugin can be got from `chrome://plugins` page in Chrome.
+app.commandLine.appendSwitch('widevine-cdm-version', '1.4.8.866');
+
+var mainWindow = null;
+app.on('ready', function() {
+ mainWindow = new BrowserWindow({
+ webPreferences: {
+ // The `plugins` have to be enabled.
+ plugins: true
+ }
+ })
+});
+```
+
+## プラグインの検証
+
+プラグインが動作するかどうかを検証するために、次の方法を使用できます。
+
+* devtoolsを開き、Widevine CDMプラグインに`navigator.plugins`が含まれているかどうかを確認します。
+* https://shaka-player-demo.appspot.com/ を開き、`Widevine`で使用するマニフェストをロードします。
+* http://www.dash-player.com/demo/drm-test-area/を開き、`bitdash uses Widevine in your browser`をチェックし、ビデオを再生します。